SharePoint, Teams and OneDrive Entra Application for imDocShare Sync Prerequisites
Create the certificate
- Generate a self-signed certificate using the PowerShell command below:
$cert =
New-PnPAzureCertificate -CommonName "<certificate name>"
-OutPfx .\<certificate file name>.pfx -OutCert .\<certificate file
name>.cer -ValidYears 2 -CertificatePassword (Read-Host -AsSecureString
-Prompt "Enter Certificate Password")
- “Enter Certificate Password” should be replaced with a password.
- Write down this password for future reference as Certificate Password.
- After executing the command, find the .cer and .pfx files from the respective path for future usage.
Note: Please
ensure that PowerShell version 7.4.4 is installed and run Install-Module
PnP.PowerShell -Scope CurrentUser
Create Entra Application
• Login to the Azure portal and select App Registrations.
• Select New registration from the App registrations page.
• Fill the following highlighted field values and click Register in the Register an application page.
• Go to the Application Overview page after completed the application registered.
• Write down the Tenant ID and Entra App ID from this page.
- Directory (tenant) ID as Tenant ID
- Application (Client) ID as Entra App ID
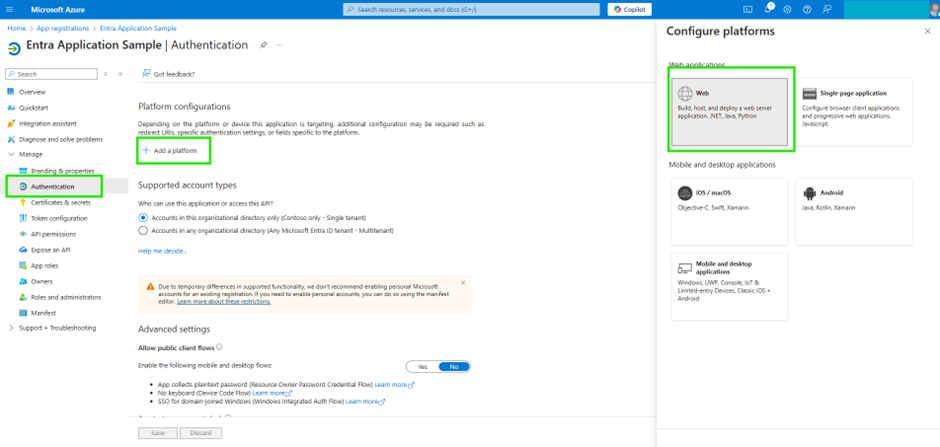
Generate Authentication
• Click the Authentication menu from the left-side menu.
• Click Add a Platform.
• Click Web and then Configure Web.
• Enter https://sync.imdocshare.com/assets/spauth/index.html in the Redirect URIs input.
• Check the boxes for Access tokens (used for implicit flows) and ID tokens (used for implicit and hybrid flows).
• Click Configure to save the configuration.
• Verify that the Redirect URI was properly added from the Authentication pane.
Add Certificate & Client Secret
• Click the Certificates & Secrets menu from the left side.
Upload Certificates
• Click Certificates tab to navigate the Certificates list
• Click Upload certificate.
• Add the certificate that was previously created (the .cer file) and enter a description.
• Click Add button to complete the upload.
• After completing the certificate upload write down the Thumbprint as Certificate Thumbprint.
Create Client Secret
• Click the Client Secrets tab
• Click New client secret
• Enter the description and choose an expiry date for the client secret in the popup.
• Click Add button.
• After creating the secret write down the secret value as Application Secret and Secret ID.
API Permissions (SharePoint Only)
• Click API Permissions menu from the left menu,
• Click Add a permission and add the following permissions
Microsoft Graph
- AppCatalog.Read.All (Application)
- Channel.Create (Application)
- Channel.ReadBasic.All (Application)
- ChannelMember.ReadWrite.All (Application)
- ChannelSettings.ReadWrite.All (Application)
- Contacts.ReadWrite (Application)
- Directory.ReadWrite.All (Application)
- Files.ReadWrite.All (Application)
- Group.ReadWrite.All (Application)
- profile (Delegated)
- Sites.FullControl.All (Application)
- Sites.Manage.All (Application)
- Sites.ReadWrite.All (Application)
- Sites.Selected (Application)
- Tasks.ReadWrite.All (Application)
- Team.Create (Application)
- Team.ReadBasic.All (Application)
- TeamMember.ReadWrite.All (Application)
- User.Read (Delegated)
- User.ReadWrite.All (Application)
SharePoint
- AllSites.FullControl (Delegated)
- Sites.FullControl.All (Application)
- Sites.Manage.All (Application)
- Sites.Selected (Application)
Click Grant admin consent for {tenantName}
Note:
• The imDocShareSync web and desktop applications use Delegated permission.
• The imDocShareSync Scheduler application use Application permission.
Adding the SharePoint Connection on imDocShare Sync
Desktop
• Add a new SharePoint connection
• Fill in every required field with the values from previous steps
• Add Tenant Name
• Add Tenant URL
• Add Tenant ID
• Add App ID
• Upload the generated certificate (.pfx file)
• Enter the certificate password
• Enter the Certificate Thumbprint
• Enter the App Secret
Adding the Teams Connection on imDocShare Sync Desktop/Web app
Open the imDocShare Sync Admin application, navigate to Teams and Add a connection.
- Teams Tenant – Enter a name you would like to use
- Tenant ID – Enter the Directory (tenant) ID noted from previous step
- Client ID – Enter the Application (client) ID noted from previous step
- Client Secret – Enter the Value generated from step 8 from adding new client secret
Adding the Teams Connection on imDocShare Sync Desktop/Web app
Open the imDocShare Sync Admin application, navigate to OneDrive and Add a connection.
Now you have the Client ID, Secret, Tenant ID generated and ready. This last step shows how to use the values to connect.
Open the imDocShare Sync Admin application, navigate to OneDrive and Add a connection.
OneDrive Tenant – Enter a name you would like to use
- Tenant ID – Enter the Directory (tenant) ID noted from previous step
- Client ID – Enter the Application (client) ID noted from previous step
- Client Secret – Enter the Value generated from step 8 from adding new client secret
Grant granular access to SharePoint sites (optional)
Prerequisites:
1. Install Postman to make http requests
Steps
Get SharePoint Site IDs
1. Go to Microsoft Graph Explorer at https://developer.microsoft.com/en-us/graph/graph-explorer
2. Sign into your Microsoft account in Graph Explorer (Click the profile icon in the top-right)
3. Click on the Modify permissions tab in the center section
4. Click the Open the permissions panel link
5. Search for “Sites.Read.All”, and check it
6. Click the Consent button at the bottom and consent to this permission (this gives Graph Explorer all sites read access)
7. In Microsoft Graph Explorer, set the request type to GET and enter the following URL, then press Run query:
8. Copy the ID value from the response at the bottom, this is your Site ID
Set the
permissions for the desired site
Open the Postman application
- Create a new request and open the Authorization tab
3. Set the Type to OAuth2.0
4. Under Configure New Token > Configuration Options, set the following fields:
- Grant Type to “Client Credentials”
- Access Token URL to the endpoint https://login.microsoftonline.com/{tenant_id}/oauth2/v2.0/token
- Client ID to your Application (client) ID
- Client Secret to the value of a secret for your App
- Scope to offline_access https://graph.microsoft.com/.default
- Client the Get New Access Token button and click Proceed, then click Use Token in the top-right
Next, we will configure the request
1. Change the type in the top-left to POST, from GET
2. Enter the URL: https://graph.microsoft.com/v1.0/sites/{Site ID}/permissions as the endpoint. Make sure to change {Site ID} to the Site ID that we copied earlier
3. Click on the Body tab, select raw, then change the type from Text to JSON
4. Add the following JSON body, and make sure to fill in the {client_id} and {app_name} from the Entra Application that was created earlier
{
"roles": [
"fullcontrol"
],
"grantedToIdentities": [
{
"application": {
"id": "{client_id}",
"displayName": "{app_name}"
}
}
]
}
5. Then click Send and you should receive a 201 Created success
Remove
Sites.FullControl.All access
Back on the Azure Application, go to API Permissions and remove both permission and consent for Sites.FullControl.All, for both SharePoint and Microsoft Graph by clicking on the three dots next to the permission
Check that
it works
1. On Postman, create a new request
2. Keep it as GET and leave the body empty
3. Reuse the same Authorization setup from the previous section
4. In the endpoint, enter: https://graph.microsoft.com/v1.0/sites/{Site ID}, replacing {Site ID} with the Site ID we copied earlier
5. Press Send
If you get a 200 OK response, the access is now set up properly
Related Articles
How does imDocShare Sync help us?
imDocShare Sync lets you automatically perform bi-directional/one-way sync of everything or selected folders/files, including metadata fields, between SharePoint, Teams Files, OneDrive Libraries, and iManage Work Server 10.2+ / iManage Cloud content ...Does imDocShare allow to access iManage Work Server 10.2+ / iManage Cloud content “live” content in Microsoft Teams?
Yes, imDocShare allows to View, Edit & Bi-directional & one-way Sync and migration from SharePoint/Teams/OneDrive to IManage Work Server 10.2+ / iManage Cloud content and sync iManage Work Server 10.2+ / iManage Cloud content as document links to ...imDocShare v3.7.0.0511
imDocShare One Release date: (05/11/2024) New Features On stop co-authoring, display the name of the current collaborator actively working on the document. Note: "AllSites.Manage" permission is mandatory for this action. Go to Azure app registration ...Does imDocShare allow to access iManage Work Server 10.2+ / iManage Cloud content “live” content in SharePoint?
Yes, imDocShare allows to view, add, edit, attach, search, sync, & provision iManage Work Server 10.2+ / iManage Cloud content “live” content in SharePoint Intranet Sites & Pages as well as in the SharePoint Client Extranet Sites & Pages.Does imDocShare allow to access iManage Work Server 10.2+ / iManage Cloud content “live” content in Microsoft OneDrive for Business?
Yes, imDocShare allows View, Edit, and Bi-directional & one-way Sync, incl. OneNote sync.